|
The copyright of all images shown
on this page is owned by M. Feuerbacher.
|
by M. Feuerbacher, 2003.
The following procedure shows how to set the infinity focus of any camera without the use of an autocollimator. It is a slight variation of a procedure presented by Rick Oleson on his website and I hereby acknowledge his presentation.
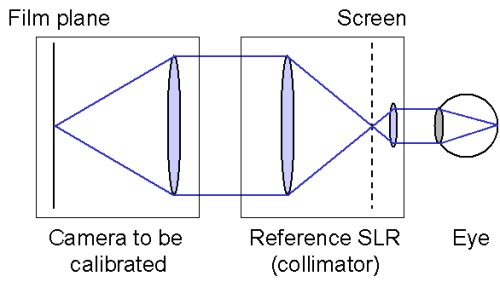
The basic idea is to use a SLR camera with perfect infinity-focus setting as a collimator. With this camera, you look into the lens of the camera to be calibrated. A transparent object, on which the calibration can be peformed, is placed in the film plane. Rick uses a piece of frosted tape with a cut in it, I decided to use a piece of film with scratches in them because is it closer to the real-life situation. Other variations are possible, e.g. to use a hair on a glass plate, etc.
Critical issues of this method are
| This is a general sketch of the setup. Note that the distance between the cameras does not matter since, due to the infinite focus setting of both cameras, the beams are parallel here. | |
| In order to obtain a situation as realistic as possible, I use a piece of b&w film as focusing object. There are vertical scratches in it on the emulsion side, i.e. the side, which is oriented towards the lens. Vertical scratches are good if the split-image focusing screen of the SLR has a horizontal separation (and vice versa). The piece of film should be long enough to cover the whole area between the spools and the rollers (if present). | 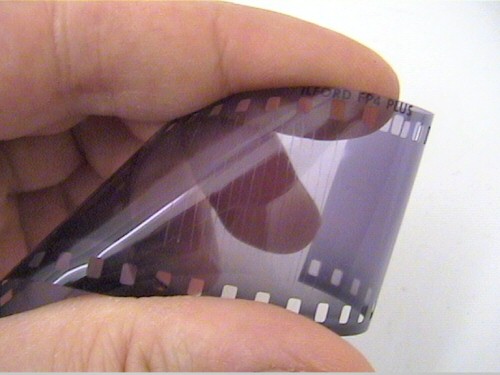 |
|
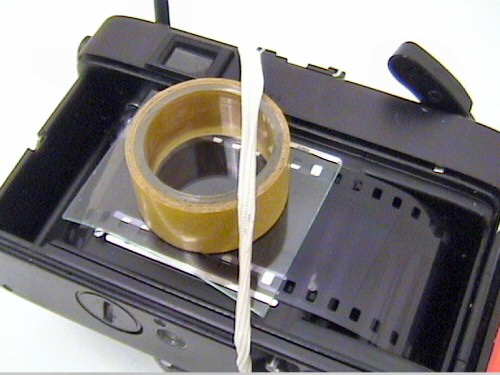
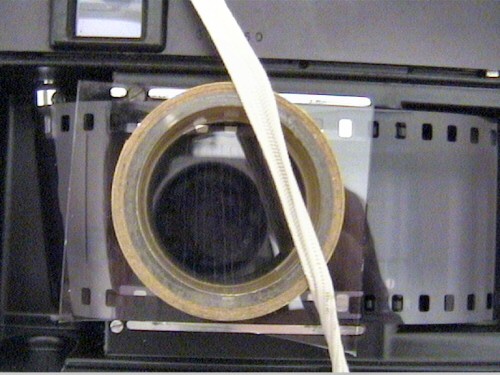
The piece of film is placed in the camera in the position, at which the film is located in normal operation. I use a piece of glass of about 40 x 50 mm in order to mimick the film pressure plate. Note that the two pairs of film rails to not have the same height. The inner pair is lower by approximately 100 µm so that the film can move over them while they define the distance between the film and the lens, The outer pair serves as a guiding rail. The film pressure plate attaches to the outer pair, and so should do the glass plate.
|
 |
|
Make sure that the glass plate does only ly on the outer rails and not on any other elevated parts such as the cogs of the transport axis, alignment screws etc. The glass plate is pressed against the rails by means of an elastic band. In order to distribute the pressure evenly, I put a tape roll between the elastic and the glass, which leaves free the area of observation. |
 |
|
The camera to be calibrated and the reference SLR are placed lens to lens. The focus of both cameras have to be set to infinity. Set the shutter to "B" and open the shutter and aperture of the camera to be calibrated permanently with a cable release that can be fixed with a screw . Place a lamp behind the camera to be calibrated and evenly illuminate the film plane. Watch the film plane through the SLR. Here I am using a Contax RTS II to calibrate a Konica Auto S3 rangefinder. |
 |
|
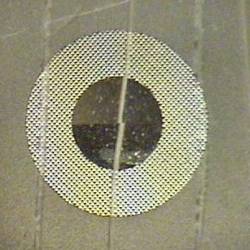
This is a view through the finder of the SLR. On the left you see one of the scratches in the split-image screen showing a horizontal offset due to a wrong infinity-focus setting. On the right a perfectly calibrated situation is seen. |
 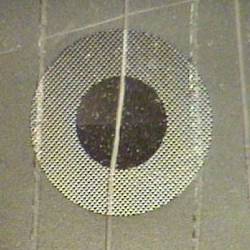 |
| It depends on your individual camera how you can eventually adjust the infinity setting. In the simplest case, you can open a couple of small screws on the outer focusing ring in order to move the latter relative to the helicoid in the lens barrel. Set the helicoid such that the vertical line shows no offset on the split-image screen (as shown on the right image). Then, turn the focusing ring alone (i.e. without moving the helicoid) and oppose the infinity symbol exactly to the marker of the focusing scale. Finally, tighten the screws in this position. This procedure can be applied to most Yashica rangefinders. For other cameras the adjustment can be substantially more difficult. |